LizardFS
Lizardfs is a distributed file system that originates from MooseFS and spans over multiple servers/systems automatically replicating and managing a mountable file-system.
For this testing purpose and prove of concept I’ve chosen a limited setup with four hosts:
Host1: LizardFS master (Master + Chunk-server)
Host2: Chunk-server
Host3: Chunk-server
Host4: LizardFS Metalogger (Metalogger + Chunk-server)
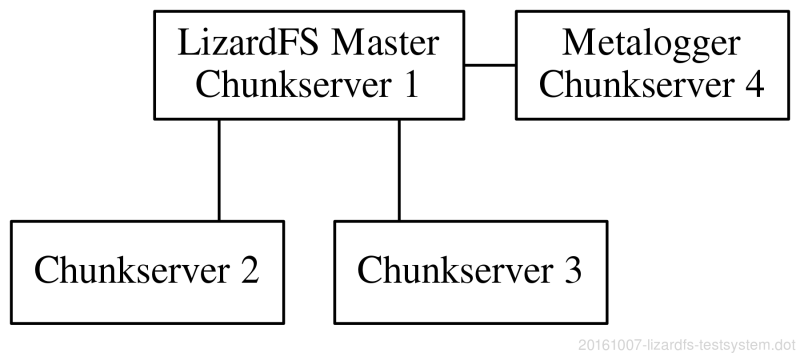
I have deployed the chunk-server of all hosts, though it’s against best practices. I needed something to play with, so a higher number of a chunk-servers was preferable compared to throughput.
Configuration
Setup
The environment has been setup in Vagrant/Virtualbox on CentOS 7.1. The shared network between the nodes is 172.16.34.0/24.
Vagrant
The machines used looked as follows:
config.vm.define "lizard01" do |ld1|
  ld1.vm.box = "centos71"
  ld1.vm.box_check_update = false
  ld1.vm.network "private_network", ip: "172.16.34.10"
  ld1.vm.provision :shell, path: "lizard/bootstrap.lizard01.example.com.sh"
  ld1.vm.provider "virtualbox" do |vb|
    vb.memory = "1024"
  end
end

config.vm.define "lizard02" do |ld2|
  ld2.vm.box = "centos71"
  ld2.vm.box_check_update = false
  ld2.vm.network "private_network", ip: "172.16.34.11"
  ld2.vm.provision :shell, path: "lizard/bootstrap.lizard02.example.com.sh"
  ld2.vm.provider "virtualbox" do |vb|
    vb.memory = "528"
  end
end

config.vm.define "lizard03" do |ld3|
  ld3.vm.box = "centos71"
  ld3.vm.box_check_update = false
  ld3.vm.network "private_network", ip: "172.16.34.12"
  ld3.vm.provision :shell, path: "lizard/bootstrap.lizard03.example.com.sh"
  ld3.vm.provider "virtualbox" do |vb|
    vb.memory = "528"
  end
end

config.vm.define "lizard04" do |ld4|
  ld4.vm.box = "centos71"
  ld4.vm.box_check_update = false
  ld4.vm.network "private_network", ip: "172.16.34.13"
  ld4.vm.provision :shell, path: "lizard/bootstrap.lizard04.example.com.sh"
  ld4.vm.provider "virtualbox" do |vb|
    vb.memory = "1024"
  end
end
Node
Each node has the host name set during the bootstrap process:
#!/bin/bash

# Host specific stuff
hostnamectl set-hostname lizard01

# Include package installation
source /vagrant/lizard/install.yum.sh

# Install lizardfs master
source /vagrant/lizard/install.lizardfs-master.sh

# Install Webinterface
source /vagrant/lizard/install.cgiserv.sh

# Install Chunk-server
source /vagrant/lizard/install.chunk.sh
The rest of the installation is sourced from other files during the bootstrap process in order to make the management easier. The example below show the bootstrap file for the master server (lizard01) only. For the other nodes other packages have been added or removed.
The bootstrap files are translated to a bash script from the Quick Start Guide <https://github.com/lizardfs/lizardfs/wiki/Quick-Start-Guide> and extended by OS specific settings like Package management, service configuration and firewall settings.
Master
The master gets the most installation packages
Master
Chunk-server
CGI Web-interface
The installation of the lizardfs-master server:
# Install the lizard ..ssssssss
#lizardfs-client lizardfs-adm
yum install -y lizardfs-master lizardfs-adm

# Create empty metadata file
cp /var/lib/mfs/metadata.mfs.empty /var/lib/mfs/metadata.mfs

# Create example configuration
cp /etc/mfs/mfsexports.cfg.dist /etc/mfs/mfsexports.cfg
cp /etc/mfs/mfsmaster.cfg.dist /etc/mfs/mfsmaster.cfg

# All local host to access the test machine
echo '172.16.34.0/24 / rw,alldirs,maproot=0' >> /etc/mfs/mfsexports.cfg

# Enable lizard master
echo 'LIZARDSFSMASTER_ENABLE=true' >> /etc/default/lizardfs-master

# Start the service
service lizardfs-master restart
chkconfig lizardfs-master on

# Configure firewall
firewall-cmd --zone public --add-port 9419/tcp --permanent
firewall-cmd --zone public --add-port 9420/tcp --permanent
firewall-cmd --zone public --add-port 9421/tcp --permanent
firewall-cmd --zone public --add-port 9422/tcp --permanent
firewall-cmd --reload
Without the complete firewall configuration on all nodes I experienced problems copying the files to the destination. I suspect that at least one chunk-server did not have the correct firewall settings applied and therefore the copy-process failed at a certain point. By reviewing the firewall settings and fixing them, the time required to copy the files and the overall performance as well as error message in /var/log/messages on the LizardFS-master improved.
CGI
The CGI web-interface on the lizardfs-master is configured as follows:
# Install
yum install -y lizardfs-cgiserv

echo 'LIZARDFSCGISERV_ENABLE=true' > /etc/default/lizardfs-cgiserver

# Start service
service lizardfs-cgiserv start
chkconfig lizardfs-cgiserv on

# firewall
firewall-cmd --zone public --add-port 9425/tcp --permanent
firewall-cmd --zone public --add-port 9425/tcp
The web-interface then is available at http://172.16.34.10:9425.
Chunk-server
Each Chunk-server is a file node for the master and shares the following setup:
yum install -y lizardfs-chunkserver

cp /etc/mfs/mfschunkserver.cfg.dist /etc/mfs/mfschunkserver.cfg
cp /etc/mfs/mfshdd.cfg.dist /etc/mfs/mfshdd.cfg

# Setup master in host file
echo '172.16.34.10 mfsmaster mfsmaster.example.com lizard01 lizard01.example.com' >> /etc/hosts
echo '172.16.34.11 lizard02 lizard02.example.com' >> /etc/hosts
echo '172.16.34.12 lizard03 lizard03.example.com' >> /etc/hosts
echo '172.16.34.13 lizard04 lizard04.example.com' >> /etc/hosts

# Configure mountpoint
mkdir /data
echo '/data' >> /etc/mfs/mfshdd.cfg
chown -R mfs:mfs /data

# Start chunkserver
service lizardfs-chunkserver start
chkconfig lizardfs-chunkserver on

# Firewall config
firewall-cmd --zone public --add-port 9422/tcp --permanent
firewall-cmd --zone public --add-port 9420/tcp --permanent
firewall-cmd --reload
Metalogger
The Metalogger is configured with a chunk-server on the fourth node only.
# Install package
yum install -y lizardfs-metalogger

# Set configuration
cp /etc/mfs/mfsmetalogger.cfg.dist /etc/mfs/mfsmetalogger.cfg

# Add hostentry
echo '172.16.34.10 mfsmaster mfsmaster.example.com lizard01 lizard01.example.com' >> /etc/hosts

# Enable logger as a service
echo 'LIZARDFSMETALOGGER_ENABLE=true' > /etc/default/lizardfs-metalogger

# Service management
service lizardfs-metalogger start
chkconfig lizardfs-metalogger on
Firewall
I am missing an overview from LizardFS about which components need access to where and what. So far I configured the following which seems to work:
master:
  9419/tcp incoming metalogger/shadow master
  9420/tcp incoming chunkserver
  9421/tcp incoming client/mount
  9424/tcp incoming tapeserver
chunkserver:
  9422/tcp incoming client/mount
So the communication looks like this:
extern                -> lizardfs-cgi       : 9425/tcp
extern                -> lizardfs-master    : 9421/tcp
lizardfs-chunkserver  -> lizardfs-master    : 9420/tcp
lizardfs-metalogger   -> lizardfs-master    : 9419/tcp
lizardfs-master       -> lizard-chunkserver : 9422/tcp
The result are the following port opening on the nodes:
node1: 94[19-22]/tcp
node2: 9422/TCP
node3: 9422/TCP
node4: 9422/TCP
Labels
A chunk-server node can be given a label, e.g. based on the location or anything else. Those can be re-used within the goal configuration to assign files or directories to a certain location.
For testing purposes, each node got the label according their name:
lizard01 -> node1
lizard02 -> node2
lizard03 -> node3
lizard04 -> node4
Those are re-used in the goal configuration. Changing a label requires the lizardfs-chunk-server to be reloaded.
Goals
Goals are like policies. They define where to put the data and how many copies to keep. The configuration of those is a bit hidden, but understandable.
There are 40 possible goals (policies), all defined on the lizardfs-master in /etc/mfs/mfsgoals.cfg. Less goals than the maximum can be defined.
The structure of the definition is like this:
id name : label
id is a numeric value of the range 1 to 40.
name is a custom string, like ‘ssd’, ‘default’ or anything else.
label is a string used as label on at least one of the chunk-servers. Using the underscore as label ‘_’, means any available chunk-server.
Example:
# Goal '3', a copy on three, random chunk-server
3 3 : _ _ _
The default goal is ‘1’, which keeps only a single copy of the file on the file-system on one chunk-server. This shows as endangered files in the CGI web-interface and can be resolved by changing the goal configuration or assigning a different goal to a file/directory.
For testing I used two goals:
2 special : node4 node3
3 default : node1 node2 node3
Goal special: some “special” files which shall be placed on node4 and node3 only.
Goal default: Files shall be evenly distributed between node1, node2 and node3.
The assignment of goals is happening from client which has already mounted the lizardfs-export into the file-system. Then it’s basically:
$ lizardfs setgoal <goalname> /full/path/to/directory/or/files
Example: Mounted in /mnt/lizardfs the folder special-files and all containing files shall get the goal with the name special:
$ lizardfs setgoal -r special /mnt/lizardfs/special-files
Disks
The configuration file /etc/mfshdd.cfg defines which folders should be used for storing the information on the local machine. Changes require the service lizardfs-chunkserver to be reloaded/restarted.
Concepts
Trash
Removed files are being moved into a Trash location where they can be retrieved until a timeout period has passed. The trash location is not visible from the default mount point, but must be mounted as meta-data:
$ mfsmount /mnt/lizardfs-meta -o mfsmeta
The sub-folder trash contains the deleted files. To restore them they only need to be moved into the sub-directory /trash/undel.
Files that had assigned the default goal 1 with one chunk-server assigned and therefore had the status endangered still were shown as endangered when they were deleted. After the timeout for the trash folder and the automatic clean up, those files disappeared from the CGI web-interface. This can be confusing. Manually cleaning those files away can make the status more clear. During this testing I set the timeout period down to 30 seconds, so I did not have to deal with this.
Issues
Documentation
The documentation of LizardFS seems to be a bit thin. The quick start guide on www.lizardfs.com is working nicely, but the pdf document with the more technical details lacks a bit of depth IMHO. I would be happy to contribute if required. Other than that a playground for testing out the commands and how LizardFS works should be considered in order to get used to the behavior and to test configuration changes.
Time-stamps
In this test environment the time-stamp in /var/log/messages were referring to a different timezone than what the server were set to. All nodes were setup with the wrong timezone and have been adjusted afterwards, but the log files still were collected two hours in the past. This got fixed after all machines had been restarted.
Switching manually to shadow master
Running a shadow master beside the production master is quite simple. The switch-over is trivial as well, but keeps some traps ready.
As in the test setup described the host “mfsmaster”/”mfsmaster.example.com” is placed in /etc/hosts. Taking that node out now requires updating that information all remaining hosts as well. A central DNS entry would make the management easier, but also put a DNS timeout window into the game. The same is required for all clients that mount the export from the lizardfs-master.
The configuration on the shadow master must be identical to the production master. A different goal configuration will result in a re-balancing progress that can lower the redundancy of the chunks. Since the configurations are not synced automatically, some third-party tools (e.g. configuration management tools) can be put to good use here.
Switching from the master to the shadow worked without a problem. Switching back - however - required a restart of the chunk-server and metalogger services on the connected nodes. All of them.